
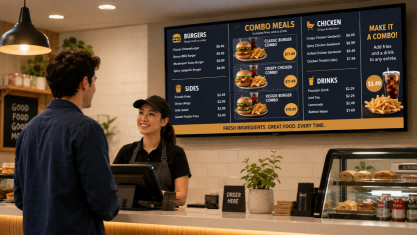
Many restaurants, cafés, and takeaway businesses are looking for simple ways to display menus, promotions, and special offers digitally. A common question is: Can a regular TV be used as a digital menu board? The answer is yes, but the best setup depends on your business needs, update frequency, screen usage time, and content management requirements. In this guide, we will explain how to turn a TV into a restaurant menu board, compare different setup methods, and highlight when a commercial digital menu board display may be a better choice for long-term use.
Can a TV Be Used as a Digital Menu Board for Restaurants?
Yes, a regular TV can be used as a digital menu board for restaurants, cafés, takeaway shops, bakeries, and fast food counters. If the TV can display images, videos, or content from an external device, it can show menu items, prices, combo meals, daily specials, and promotional messages on screen.
For a small restaurant, this can be a simple and affordable way to replace printed posters or static menu boards. A café might use one TV to show drinks and desserts. A takeaway counter may use a screen for lunch specials. A fast food shop can display combo meals, add-ons, and limited-time offers near the ordering area.
However, the best setup depends on how you plan to use the screen. There are four common ways to turn a TV into a restaurant menu board:
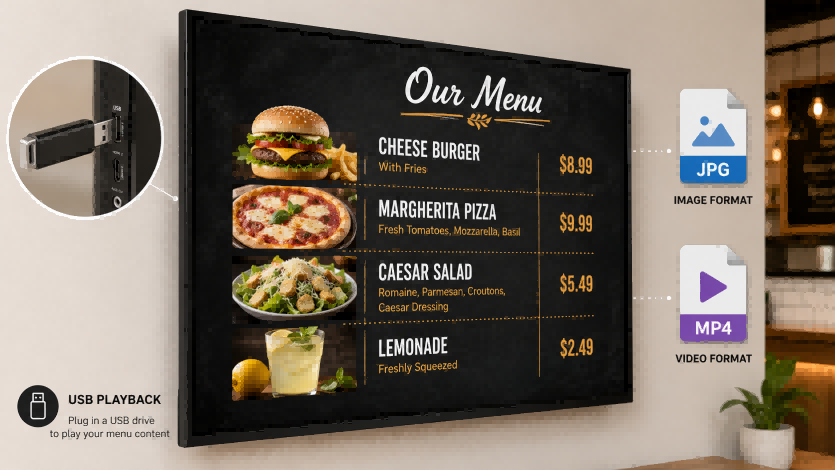
- USB slideshow: Best for simple menus that do not change often. You create menu images or videos, save them to a USB drive, and play them on the TV.
- Smart TV app: Suitable if your TV supports compatible apps and internet connection. This can make content updates easier than using USB.
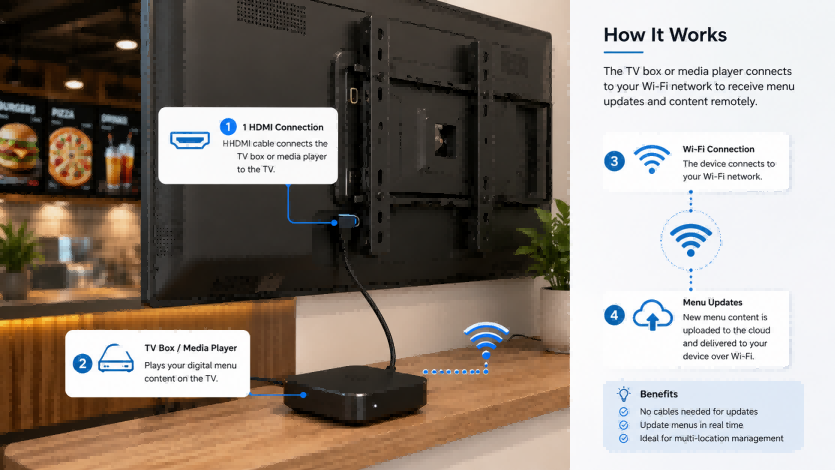
- Media player or TV box: A good option when you want more stable playback or easier content control through an HDMI-connected device.
- Digital signage CMS: Best for restaurants that need remote menu updates, scheduled breakfast/lunch/dinner menus, multiple screens, or regular promotions.
A Smart TV is helpful, but it is not always required. Even a non-smart TV can work if it has an HDMI port for a media player or a USB port for basic playback.
That said, a regular TV is usually better for lightweight or temporary menu display. If your restaurant needs screens running for long business hours, portrait installation, higher brightness, remote management, or a more professional front-counter setup, it may be worth comparing a regular TV with a commercial digital menu board display before making a final decision.
What You Need Before Turning a TV Into a Menu Board
Before setting up a TV menu board, first decide how often your restaurant needs to update the menu. If the menu rarely changes, a USB drive may be enough. If you need to update prices, lunch specials, combo meals, or promotions often, a media player or digital signage software will be easier to manage.
Check these items before setup:
- TV position: Place the screen above the counter, behind the cashier, or near the ordering area where customers can read it easily.
- Screen size: Make sure menu names and prices are readable from the customer’s viewing distance.
- USB port: Useful for a simple USB menu board with JPG images or MP4 videos.
- HDMI port: Needed if you want to connect a TV box, streaming stick, mini PC, or digital signage media player.
- Internet connection: Not required for USB playback, but needed for remote updates, menu scheduling, or multi-screen control.
- Menu files: Use clear JPG images or MP4 videos. Avoid using a print menu file with small text.
- Screen direction: Landscape is easier for most TVs. For portrait menu boards, check whether your content or player supports vertical display.
- Power settings: Turn off sleep mode or auto power-off if they interrupt playback.
In short, USB works for a basic restaurant menu board, but frequent menu updates are better handled with a media player or digital signage CMS.
Best Ways to Display a Restaurant Menu on a TV
There are several ways to display a restaurant menu on a TV. The best choice depends on how often you update the menu, how many screens you use, and whether you need remote control.
| Method | Best For | What You Need | Main Benefit | Limitation |
|---|---|---|---|---|
| USB slideshow | Small café or simple takeaway menu | TV + USB drive + JPG/MP4 files | Free and easy to start | Updates must be done manually |
| Smart TV app | Restaurants with a compatible Smart TV | Smart TV + internet + signage app | No extra hardware needed | App support depends on the TV system |
| TV box or streaming stick | Small restaurants needing easier updates | HDMI device + app | More flexible than USB | Requires an extra device |
| Digital signage player + CMS | Restaurants with frequent menu changes or multiple screens | Media player + digital signage software | Remote updates, scheduling, multi-screen control | Needs software setup |
| Commercial digital menu board display | Fast food counters, food courts, or long business hours | Commercial display hardware | More stable for restaurant use | Higher initial investment |
For a small café with one simple menu, a USB slideshow may be enough. You can design menu images, save them to a USB drive, and play them on the TV. This works well when prices and menu items do not change often.
If your restaurant uses a Smart TV, a signage app can make the setup easier. You may be able to upload or manage content through the app instead of replacing USB files every time.
For many small restaurants, a TV box, streaming stick, or media player is a practical middle option. It connects through HDMI and gives the TV better content control. This is useful for takeaway shops, burger shops, bubble tea stores, or cafés that update promotions regularly.
If you manage several screens or need different menus at different times of day, digital signage software is usually the better choice. A CMS can help schedule breakfast, lunch, dinner, combo meals, and limited-time offers without manually changing files on each screen.
For restaurants that run screens for long hours every day, especially fast food stores or multi-location businesses, a commercial digital menu board display may be more suitable than a regular TV.
In short, use USB for a basic menu, use a media player or Smart TV app for easier updates, and use digital signage software when your restaurant needs remote control, scheduling, or multiple menu screens.
How to Turn a TV Into a Digital Menu Board Step by Step
Turning a TV into a digital menu board is not complicated, but the setup can go wrong if you start with the wrong content size, wrong playback method, or unreadable menu design. The goal is simple: prepare your menu content, connect it to the TV, make it play continuously, and check whether customers can read it clearly from the ordering area.
Step 1: Choose a Landscape or Portrait Layout
First, decide whether your TV menu board will be horizontal or vertical. Most TVs are easier to use in landscape mode, which works well for full menu lists, combo meals, and category-based restaurant menus.
A portrait menu board can look good for cafés, bubble tea shops, dessert shops, or single-product promotions, but it may need extra setup. Some regular TVs do not rotate the system menu, so you may need to rotate the content file or use digital signage software that supports portrait display.
Step 2: Design Your Menu Slides
Create your menu slides before connecting anything to the TV. You can design a breakfast menu, lunch combo slide, dinner menu, daily special, or promotion screen.
Keep each slide simple. Use large text, clear prices, and only the most important items. A TV menu board is viewed from a distance, so it should not look like a printed menu with too many small details.
For example, one screen can show main dishes and combo meals, while another slide can show drinks, desserts, or limited-time offers.
Step 3: Export Menu Files in the Right Format
After designing the menu, export the files in a format your TV or player can read. For basic menu slides, JPG is usually suitable. For animated menus, food videos, or rotating promotions, MP4 is a common option.
If your menu looks blurry on the TV, the file may be too small or exported at low quality. Use clear images and avoid stretching small design files onto a large screen.
Step 4: Connect Your USB, Smart TV App, or Media Player
Next, choose how the menu will play on the TV.
For a basic setup, copy the menu images or videos to a USB drive, insert it into the TV, and select the USB source from the TV menu.
For a Smart TV setup, install a compatible signage app if your TV supports it. This can be more convenient than replacing USB files manually.
For a more flexible setup, connect a TV box, streaming stick, mini PC, or digital signage media player through HDMI. This option is useful when you want better control over content playback or future menu updates.
Step 5: Set Loop Playback or Menu Scheduling
If you use a USB drive, check the TV’s slideshow or video repeat settings. The goal is to make the menu play continuously without staff restarting it during business hours.
If you use digital signage software, set a playlist or schedule. For example, a restaurant can show a breakfast menu in the morning, lunch combos at noon, dinner items in the evening, and promotional slides between menu pages.
This is where software becomes useful: you can update or schedule menus without touching the TV every time.
Step 6: Test Visibility From the Ordering Area
Finally, stand where customers normally place orders and check the screen. Can you read the item names and prices quickly? Are food photos clear? Is the screen too bright, too dark, or affected by glare?
Do not only check the menu from a close distance. A restaurant menu board must be readable from the customer’s real viewing position. If customers need to walk closer to read prices, the layout should be simplified or the font size should be increased.
Once the content is clear, playback is stable, and the screen stays on during service hours, your basic restaurant digital menu board setup is ready. The next step is to improve the menu layout and avoid common display problems.
How to Design Menu Content That Looks Good on a TV
A TV menu board is different from a printed menu. Customers read it from a distance, often while standing in line. The design should help them understand the menu quickly, not force them to read every detail.
Use the following checklist when designing your restaurant menu board:
- Use large, clear text
Menu names, prices, and category titles should be easy to read from the ordering area. Avoid long descriptions and small text. - Do not upload a printed menu directly
Printed menus are designed for close reading. On a TV screen, dense rows, small prices, and long descriptions can become hard to read. - Group items by category
Organize the screen by simple categories, such as mains, sides, drinks, desserts, or combo meals. This makes the menu easier to scan. - Make prices easy to find
Keep prices close to item names and use a consistent style. Customers should not need to search for the price. - Highlight only key items
Use visual emphasis for best sellers, new items, limited-time offers, or high-margin products. Do not highlight too many items at once. - Limit the number of items per screen
If your menu has many products, split it into several slides. A clean screen is easier to read than one crowded with every item. - Use high-quality images carefully
Food photos can make the menu more attractive, but they should be clear and relevant. Avoid stretched, blurry, or low-quality images. - Use strong contrast
Text should stand out clearly from the background. Avoid placing light text on a light background or dark text on a dark image. - Prepare different menu versions
If your restaurant has different menus for breakfast, lunch, dinner, or promotions, prepare separate versions. This makes updates easier later. - Check the design from the customer’s position
Do not judge the menu only from your computer or close to the TV. Stand where customers order and check whether names, prices, and offers are readable.
For most restaurant menu board designs, readability matters more than decoration. Large text, clear prices, simple categories, and fewer items per slide usually work better than a crowded screen full of information.
Common Problems When Using a TV as a Restaurant Menu Board
After the menu board is set up, the bigger challenge is usually daily operation. A TV menu board may work well on the first day, but problems can appear when staff need to update content, switch menus, or keep the screen running during busy hours.
| Problem | Possible Reason | What to Do |
|---|---|---|
| The wrong menu is showing during service | Breakfast, lunch, dinner, or promotion files are not organized clearly | Name files by time period or menu type, such as breakfast, lunch, dinner, and promotion. |
| Old promotions stay on the screen | Staff forget to remove expired content | Set a regular review schedule before opening or closing each day. |
| Different screens show different information | Each TV is updated manually, and files are not synchronized | Use one master menu folder, or consider a CMS if several screens need the same content. |
| Staff are unsure how to update the menu | The process depends on one person or unclear steps | Create a simple internal update checklist for replacing files or changing playlists. |
| The menu changes too slowly during rush hours | Manual switching takes time when the restaurant is busy | Prepare menu versions in advance and avoid last-minute file editing. |
| Content order feels confusing | Menu slides are not arranged according to the customer ordering flow | Put main items first, then add-ons, drinks, desserts, and promotions. |
| The screen becomes distracting | Animations, transitions, or videos are too busy | Keep motion simple and avoid fast-changing visuals near the ordering counter. |
| Customers miss important offers | Promotions are placed after too many regular menu slides | Move key offers closer to the first few slides or give them a fixed area on screen. |
| The menu is hard to manage across locations | Each store edits files in its own way | Use a shared template or centralized content management process. |
| Updates are not checked before going live | Staff upload new content without previewing it on the actual screen | Always test the menu on the TV before service starts. |
Many TV menu board problems are not technical failures. They happen because the restaurant has no clear content update process. A simple screen can still create confusion if the wrong menu version is displayed, old promotions remain visible, or staff do not know who should update the content.
For one screen, a basic file checklist may be enough. For multiple screens, frequent promotions, or several restaurant locations, a more organized digital signage workflow will usually be easier to manage.
Regular TV vs Commercial Digital Menu Board Display
A regular TV can work as a restaurant menu board, but it is not the same as a commercial digital menu board display. The difference is not only the screen itself. It is also about how long the display runs, where it is installed, how often it is updated, and how important the screen is to daily restaurant operations.
For a small café with one simple menu screen, a regular TV may be enough. For a fast food counter, food court, or multi-screen restaurant setup, a commercial display may be a safer long-term choice.
| Factor | Regular TV | Commercial Digital Menu Board Display |
|---|---|---|
| Best use case | Simple or temporary menu display | Daily restaurant menu display and long-term business use |
| Operating hours | Better for shorter or lighter use | Better for longer business hours |
| Brightness | Suitable for normal indoor spaces | More suitable for bright counters, food courts, or high-traffic areas |
| Heat management | Designed mainly for home entertainment use | Designed with commercial usage in mind |
| Portrait installation | May be limited depending on the TV model | More suitable for portrait or menu board-style installation |
| Auto start | May need manual input selection after power-on | Can be easier to configure for commercial display workflows |
| Remote management | Usually depends on extra devices or apps | Often easier to combine with signage players or CMS systems |
| Appearance | Consumer-style design | Cleaner commercial look for counters, walls, and menu areas |
| Installation style | Basic wall mounting may be enough | Better for structured restaurant, food court, or chain store projects |
The key point is fit. A regular TV is not a bad choice if your menu is simple, the screen is indoors, and you do not update content often. It can be a practical starting point for a small restaurant, café, or takeaway shop.
However, the limits become more obvious when the screen becomes part of daily business. If the menu board needs to run for long hours, show clear content in a bright area, support portrait mounting, or work with scheduled menu updates, a commercial digital menu board display is usually more suitable. For larger restaurant groups or multi-location projects, understanding the Digital signage supply chain guide can help buyers evaluate manufacturer capabilities, product consistency, customization options, and long-term supply support.
You should consider upgrading when:
- The screen runs for most of the business day
- The restaurant uses several menu screens
- The menu changes by time period or location
- The display is installed in portrait mode
- The screen is close to a bright window or front counter
- Staff need easier remote updates
- The display is important for ordering speed and customer experience
For restaurant, café, food court, and multi-location menu board projects, Ikinor can support commercial digital signage display hardware with screen size, installation style, system configuration, and customization options based on project needs.
In short, use a regular TV when the menu board is simple. Consider a commercial digital menu board display when the screen becomes a core part of restaurant service, branding, and daily operation.
FAQs
Yes, a regular TV can be used as a digital menu board if it can play images, videos, or content from an external device. It works well for simple restaurant menus, café drink lists, takeaway counters, and basic promotion screens. The main limitation is that a regular TV may need extra setup for remote updates, long operating hours, or portrait installation.
The basic process is simple: prepare your menu content, save it as image or video files, connect the content to the TV, and set it to play continuously. You can use a USB drive, Smart TV app, TV box, media player, or digital signage software. The right method depends on how often your restaurant updates the menu.
Yes, you can create a basic digital menu board for free if you already have a TV and a USB drive. Design your menu in a tool such as Canva, PowerPoint, or Google Slides, export it as JPG or MP4, and play it from the USB drive. This is best for simple menus that do not change often.
Yes, a USB drive is the easiest method for a simple TV menu board. It works well for one screen and menus that do not change often. The limitation is that every update must be done manually.
Not always. For one basic screen, USB playback may be enough. Digital signage software is more useful when you need remote updates, menu scheduling, multiple screens, or different menus for different service periods.
A normal TV can work for light or moderate menu display. If the screen runs for long business hours, supports ordering decisions, needs portrait installation, or manages multiple menu screens, a commercial digital menu board display may be a better long-term choice.



 English
  Spanish
  Arabic
  French
  Indonesian
  German
  Portuguese
  Russian
  Vietnamese
  Thai
Thai  Italian